Top Reasons to Rent-A-Chicken

ChickenWhy would someone want to rent a chicken?  Have you ever wanted to experiment with a new activity, but the upfront investment has prevented you from doing so?  This is exactly why farmers around the country have started programs like Rent-A-Chicken.  At its most simple, the program is a short-term agreement where the farmer delivers chickens and all the stuff that is needed to take care of them to a customer for a specified period.  Normally chicken rentals run for six months starting around April and ending around November.

Chicken rentals are a good place to start if keeping chickens is something that you have wanted to do but were not sure if it was right for you.  The two hurdles new chicken owners encounter are the start-up costs involved with raising chickens and the work of taking care of the birds once winter arrives.  We knew we wanted chickens, but these were the two things we were unprepared for.  With a chicken rental program, the customer skips all of the “work” and goes straight to egg laying birds.

Most people do not know that the cute little peepers that you get at the feed store will not start laying eggs for up to six months.  That is quite an investment in time and resources before you get any eggs.  During the first six months, the owner acts as momma chicken.  It is your job to brood, feed, water, and clean your babies.  Let us tell you having a box of baby chicks in your living room for six weeks was not a step we enjoyed our first time around.  Although it did make for a few good stories.

The other end of the spectrum is winter care for chickens.  If you are set up for it, it is not that big a problem.  Just keep in mind the number of eggs a chicken lays is determined by the number of hours of light they have each day.  Some breeds of chickens slow down egg laying to one egg every few days during the winter to not laying any eggs at all.  In addition to lower egg production, you have to make sure their water is not frozen and that they are protected from the cold.

The last thing that most people do not mention when they are explaining how great chickens are is how they molt.  Chickens molt, or lose and replace their feathers, every sixteen months or so.  During this process, they do not lay any eggs and boy do they look sad.

The important thing about livestock is taking the good with the bad.  These are the only hurdles we find annoying throughout the year, and we would not give up our chickens because of them. Having backyard chickens allows you to know exactly how the animals producing your eggs are treated.  Chickens not only produce eggs, but they are fun to watch.  Each hen has her own personality.  They love kitchen scraps, eat annoying bugs, and fertilize the yard.  Having chickens is a great way to teach children responsibility and how to care for animals.

With a chicken rental program, the renter gets all the good and none of the bad.  Hens that are part of the program are first-year birds that have started laying eggs.  The farmer gives you all the equipment that is needed to take care of the birds, so there are no additional costs.  The farmer will also pick up the birds before all the winter chores begin.  Also, there is always someone just a phone call away to answer any questions that arise during the hens visit.

If you want to get your feet wet without the commitment renting a chicken is what you are looking for.  Two hens will produce roughly a dozen eggs per week, and if you decide you want to adopt the birds permanently you can do so at the end of the rental.

IBC Totes – What are they and what can you do with them?

IBC Tote
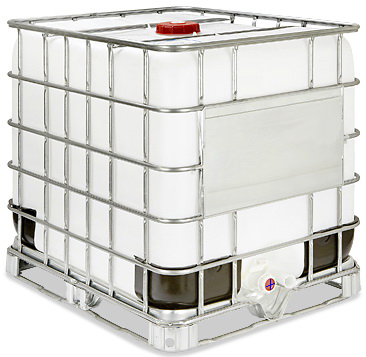
When we started down the homesteading / farming road there was one acronym that continuously popped up.  It felt like every post I looked at mentioned something called an IBC Tote.  The things people were creating with these containers were awesome, but what on earth is an IBC?  After some research, I came to find out that IBC stands for Intermediate Bulk Container and they are a standardized shipping container for liquids.

IBCs are used to transport everything from oil and soap to syrup and molasses.  They come in two standard sizes 275 gallons and 330 gallons.  The footprint of the totes are the same as a standard full-size pallet.  The plastic container is surrounded by a metal frame that creates a very sturdy container.  This allows forklifts to be used to move them and allows them to be stacked several high during transportation.

Depending on what you intend to use the tote for depends on the type you will need to find.  Most things on a homestead or farm require a food grade tote.  Totes that held oil or some sort of solvent are often the easiest to find but are not recommended for use if you plan to store something in them your or an animal is going to ingest.

If your tote contained a food product there is a very easy way to clean them out.  Put half a bottle of Dawn dish soap in the bottom and fill the tote up with water.  After is is 100% full drain the water.  Next, put 2 pounds of baking soda in the bottom and fill it up and drain it again.  The soap will cut and remove the sugar or whatever was in the tote and the baking soda will neutralize the soap.  We used this process when we cleaned a tote to hold maple sap and it worked great.

We first came across the IBC tote when researching aquaponics.  We plan to set up a good size backyard aquaponics setup in our greenhouse once it is complete.  IBC totes appear to be the standard method of construction for the backyard aquaponics.  The general construction method requires cutting the IBC’s into two pieces.  The shallower top portion becomes the grow bed and the larger bottom portion is the fish tank.

Another popular use for IBC totes is rainwater collection.  A 55-gallon drum is great, but the can fill in just a few seconds with a good spring rain.  With the ability to stack totes up to 3 tall, when full this arrangement allows someone to store over 800 gallons of water in a 40″ X 48″ footprint.  There are many how-to articles out there, but this is one of the best I have found and it includes a parts list of everything needed.


The other uses for IBC totes are limitless.  There are instructions online to turn IBC totes into livestock waters, waste oil containers, compost bins, chicken coops, mushroom grow beds, dear blinds, hot tubs, I had a guy buy one from us that he turned it into an oil change catch tray for his tractors.

We have a plan to turn one of the more beat up totes into a permanent dust bath for our chickens.  Two more will be centrally located by the well in the garden as a water tower. Then there is a third that lives in the woods by the maple evaporator used to store maple sap.  Once we get the aquaponics system up and running I am sure we will find even more fun projects for these forklift size building blocks.

The Coop – Nesting boxes

It has been a very warm Fall here in Ohio and this week Gizmo, our silver lacewing, started laying in the new nesting boxes.  All the girls went through their molting process at the same time, and she is the first to start finally laying again.  This was exciting because the new nesting boxes had not been tested yet and we were not sure if the girls would use them or not.

The move to the new coop was abrupt, and for the first few months, the nesting boxes were just sitting on the floor of the coop.  This was a problem because it required going into the coop to collect the eggs.  The nesting boxes have had quite a few little tweaks since then, and it looks like are finally finished.

Box Bar

We mounted the nesting boxes to the outside of the coop, in the same way, we attached everything else to the new coop.  Using long bolts, large fender washers, and plywood.  The plywood acts as a backing and support for the bolts supporting the weight of the boxes.  We were afraid that something this size hanging on the outside of the plastic wall would bow and stress the plastic of the wall.  With the plywood strip along the top and bottom of the holes to enter the boxes, everything is very sturdy.

We used some scrap 2 X 4 wood and two rungs from an old playset ladder to create a perch to make it easier for the birds to get into the boxes.  The two verticle pieces of plywood are what we used to screw the hinges for the lid of the nesting box to.  The plywood gave us enough material to support the weight of the lid and enough height to create a slope so water would run away from the hinges.

The big issue we had with this design was water penetration.  There was no real good way to seal the hinge side of the nesting box roof.  Our first attempt was a small piece of wood running above the seam.  The thought was water would run down the wall and out away from the hinge side.  This did not work and the bedding kept getting wet in the boxes.  The final solution was to build a little roof over the entire thing.  This worked quite well water from the roof runs onto the overhang and the amount of water that makes it to the hinge side of the list is now very minimal.

We learned from our chicken tractors that cleaning the nesting boxes can be a royal pain.  With these boxed the back wall also folds down.  This way the contents can be scraped straight out of the boxes.  This is a vast improvement from the other design.  The back wall is held in place with three small hook and eye clasps.  One on each end and one on the inside in the center to keep the back from bowing.

The lid of the nesting box also works very well as a surface to sit the feed bucket when filling the feeder.  We are very pleased with how it turned out.


The Coop – PVC chicken feeder

Feeding the chickens is a chore20151120_161239 that everyone wants to do less often.  We have been using some version of a PVC pipe chicken feeder for the last three years.  We have made many revisions and tinkered with the design and we finally have something that works well for us.  Our newest feeder looks a bit like a plumbing nightmare, but it is working very well.  The reasoning behind the feeder was we wanted to be able to fill it from outside the coop, and it needed to have enough spaces to feed multiple chickens at the same time.

We constructed the feeder from 3-inch pipe and used 4-inch T fittings for the feeding ports.  We could have used a larger diameter pipe to increase the carrying capacity of the feeder, but anything over 3-inch pipe fittings starts to get cost prohibitive.  The way the feeder is currently it holds about 17 pounds of feed.  For our flock, that is enough feed for a week.

The feeding ports for the coop are the same as the ones in our chicken tractor and, although a little complicated, and they work very well.  To build the a single feeding port, you will need one T, two knockout caps, one reducer, and a small piece of pipe.  Our goal was not to use any glue so that things could be taken apart and reconfigured if needed, so the pieces are mostly just friction fit

The only thing that needed glue for this project is the feed stopper.  Our birds like to rake the feed out of the feeder onto the floor.  To prevent this, then pound the 1-inch tall piece of pipe into the opening that is for feeding.  The 1-inch tall piece of pipe will have enough friction to stay in place.  The knockout cap does have a lip.  We put this facing in so that it is wedged against the T fitting.  This makes it harder for the birds to knock out.


Next we want to create the 20151010_171852stand and the bottom of the feeder. Ideally you will want the top of the feeding port to be level with the chickens back. Instead of trying to mount the feeder to the wall we created legs using more PVC pipe. Similar to the feed stopper we inserted a knockout cap into the bottom of our T and then inserted a piece of pipe to hold it in place, but instead of a small 1-inch tall piece of pipe we used a 7-inch piece.  This not only holds the bottom of the feeder in place but gives us our needed elevation.

The next step is altering the reducer so that the pipe will slide completely through it.  We want the pipe to pass through the reducer and be a couple inches above the knockout cap acting as the bottom of the feeding port.  This is what controls the amount of feed that is available.  The goal is to have enough feed for the birds to eat but not have it full so they can scrape it out.  As the birds eat the feed in the tube above will fall and fill the feeder.

To alter the reducer, we used a scroll saw.  We just had to run the blade around the inside of the reducer to cut off the shelf that the pipe would normally sit on.  The first one we made we did this with a wood rasp.  It took a long time but got the job done.

The last step is determining how many legs we wanted our PVC feeder to have.  We decided on three, this meant we needed two Y fittings and a few 45-degree fittings.  The nice thing about the feeder is there is only one fill port and as the stumps fill up the feed fills the next in line.  We have been using this feeder for two months at this point and it is working great.

Greenhouse Construction Part 1

It is fall, and we have finally started construction on our greenhouse.  We decided to build a lean-to style that will extend off the southern side of the pole barn.  The greenhouse will be 48 feet long by 24 feet wide once it is finished.

We attempted to start the greenhouse this past spring, but with the baby on the way and all the other projects it was put on the back burner.  Now that fall is here, we are planning for spring and it is time to get to work.

The greenhouse when finished, will have a three-foot knee wall all the way around the bottom of the walls.  This part of the wall will be covered with steel barn siding.  From this point up the entire structure will be covered with the same type of siding, but it is transparent plastic.  The wall of the barn that we are attaching to is ten feet tall.  The plan is for the southern wall to be six feet tall.  That will give us four feet of drop over the twenty-four feet width of the roof.  In roofing terms I think that is considered a two-twelve pitch because we are rising two inches for every twelve inches of horizontal run.

20151101_130929

Step one in the process was digging post holes.  After some careful
measurements, we dug holes as deep as the post hole digger would allow us to go.  Most holes ended up at least thirty inches deep.  This is deep enough that we will be below the frost line.  The next step was placing the posts and staking them so that they were square and plum.  For this process, we recycled some old 2X6 lumber from the old barn we took down.  The boards will hold the post in the correct position while the concrete dries.

20151101_132829

Once the concrete is set it is time to backfill the holes.  We had some help with this task.  The help even had an audience.  The ducks were very interested in the entire process.  The next step will be the 2X6 bottom board.  This will act as a frame for the crushed rock floor.  Once the floor is in the roof and walls will start to go up.  The construction is moving along slowly, but if everything goes according to plan there will be a finished greenhouse by spring.

20151101_131127